A look at GSM
Looking at 2G GSM traffic three decades since its inception might not sound terribly interesting, but the protocol is still surprisingly common today. It’s often used a fallback for when coverage is limited and more modern protocols aren’t available, as well as for legacy IoT devices.
In Norway, Telia and Telenor are in the process of phasing our their 3G networks. At they same time they are keeping their 2G networks operational until at least 2025. Meaning all devices that don’t support VoLTE will use 2G for calls and SMS.
There are well documented security flaws in GSM, and publicly available tools to exploit them. At the same time, it has become considerably cheaper and easier to analyze GSM traffic over the past few years. Open source tools such as gr-gsm have matured, and the community has developed methods for capturing the GSM spectrum without the need for expensive SDR radios.
With less than $100 and a weekend it’s possible to capture and analyze GSM traffic. With some extra effort it’s possible to decrypt your own traffic, and depending on how your mobile provider has set up their network it may even be possible for somebody else to illegally decrypt traffic they don’t own.
The GSM spectrum
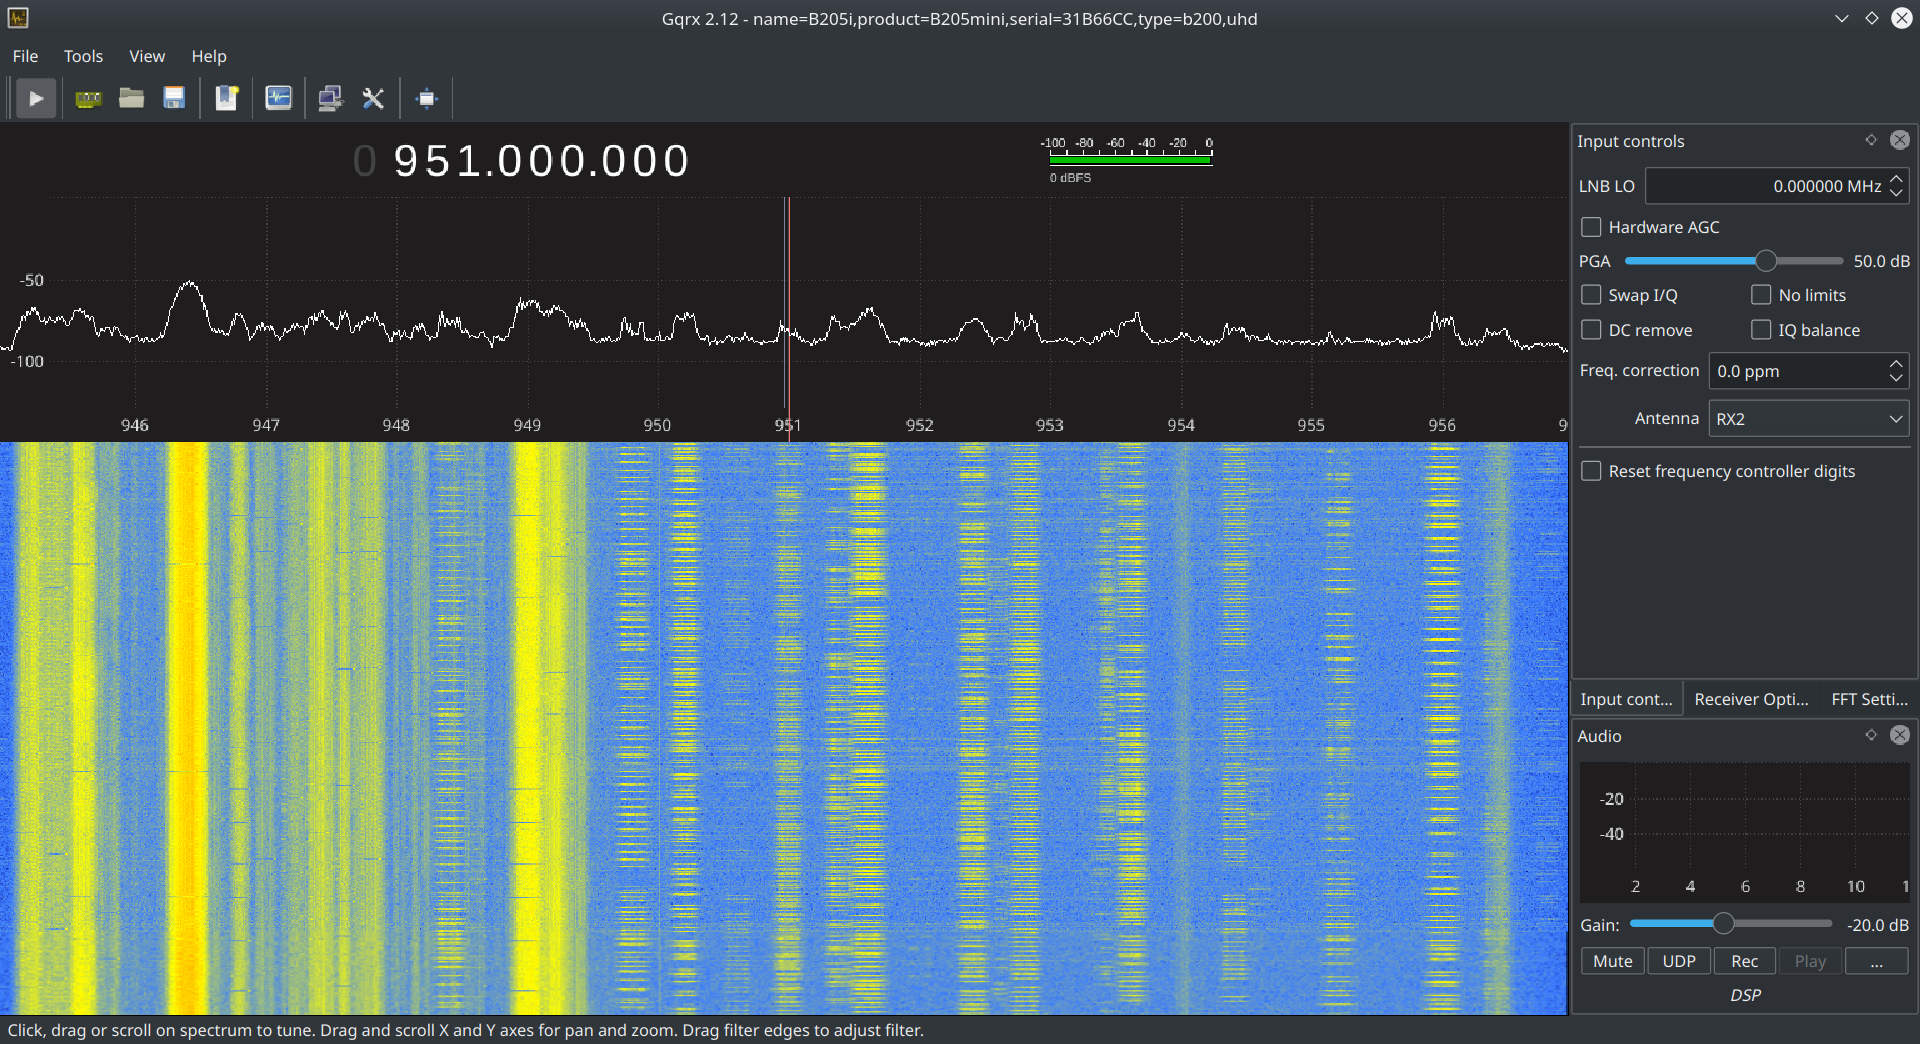
GSM spectrum, showing multiple channels
More often than not traffic will “hop” between different channels during a transmission. Hops occur quite quickly, every few milliseconds or so. In practice, this normally means if you’re interested in looking at more than a base station’s broadcast control channel (BCCH) you need a way to simultaneously capture multiple channels at once.
You can visually see the hopping in the screenshot above. Stationary control traffic is on the left, and hopping traffic is on the right. These “slices” are produced as the base stations hop between different channels during transmission.
A local tower of mine is configured to hop between ARFCN channels 57 and 112. This corresponds to downlink frequencies of 946.4 and 957.4 MHz. Channels have a bandwidth of 0.2 MHz, so that means if I want to look at both channels at once I need a radio with a bandwidth of at least 11.2 MHz (946.3 to 957.5). Keep in mind towers will be configured differently, potentially using more channels spread further apart.
Inexpensive SDRs tend to have a maximum bandwidth of about 2.4 MHz. You can overcome this limitation by using multiple radios and multi-rtl, which combines their signals together to get a larger effective bandwidth.
In my case I had access to a USRP radio that can capture up to 56 MHz of bandwidth, and that’s what I’ll be using for my tests. However, the core concepts are identical no matter what radio you use.
Other hardware
If you want to decrypt your own traffic you’ll need a way to get the Kc encryption key from your SIM card. Several guides out there use a series of AT+CRSM commands that access the SIM card through the phone’s modem. I have gotten this to work in the past, but many phones don’t expose the modem’s serial interface by default, and even if you can get access it tends to be a messy process. I prefer to use a smart card reader to pull the key from the SIM directly.
I purchased a HID OMNIKEY 6121 USB smart card reader, and some adapters from the Piswords AliExpress store to make it a bit less fiddly to swap SIMs in and out.
Software
Recent versions of Ubuntu have gr-gsm in their repositories by default. Installation on Kubuntu 20.10 was as easy as:
sudo apt install gr-gsm wireshark gqrx-sdr cardpeek
You’ll need Wireshark for looking at traffic, gqrx if you want to visually see the spectrum, and Cardpeek for pulling keys off the SIM card.
For the USRP you’ll need a bit more setup. First download the latest firmware images and then set the UHD_IMAGES_DIR environment variable.
sudo uhd_images_downloader
export UHD_IMAGES_DIR=/usr/share/uhd/images
Next, we configure the system so non-root users can access the radio.
sudo cp /usr/lib/uhd/utils/uhd-usrp.rules /etc/udev/rules.d/
sudo udevadm control --reload-rules
sudo udevadm trigger
You can test if everything is working by scanning for nearby base stations with the grgsm_scanner utility. It takes about a minute to start displaying data.

Find the base station
Before we can capture traffic we need to know what base station our phone is connected to. This is probably the station with the best signal strength, so in my scan above that would be CID 2106 on ARFCN channel 57. But to be sure lets double check.
On an iPhone you can dial *3001#12345#* which takes you to field test mode. Go to the “All Metrics” tab and scroll down to GSM Serving Cell Info.
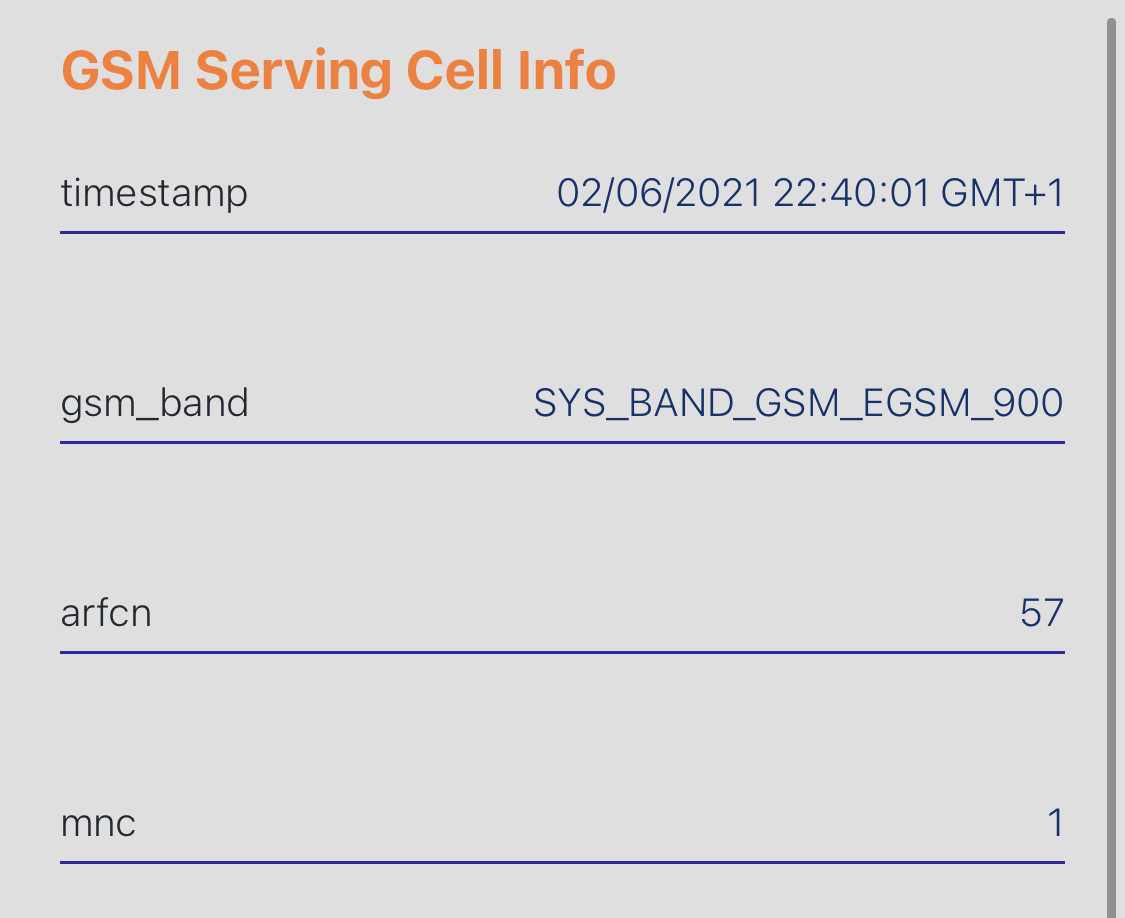
You can see that the ARFCN is set to 57, as we suspected. You can also look under “GSM Idle Config” to verify that the ci matches the CID from the scan, in this case 2106.
On Android the Network Cell Info Lite app provides similar information.
Base station ARFCNs
Next, we need to find out what channels the base station is configured to use. This is so we know what frequencies to configure our capture for. A list of these channels is periodically broadcast inside the System Information Type 1 packets from the BCCH.
The grgsm_livemon utility allows us to monitor data from the BCCH. Use the -f flag to set the frequency of the base station. You can find this in the output from grgsm_scanner, or by using the cellmapper.net ARFCN frequency calculator. (use the downlink frequency)
grgsm_livemon -f 946.4M
Traffic is piped to the system’s loopback interface inside UDP packets on port 4729. You can use this display filter to only show Type 1 packets: gsm_a.dtap.msg_rr_type == 0x19.
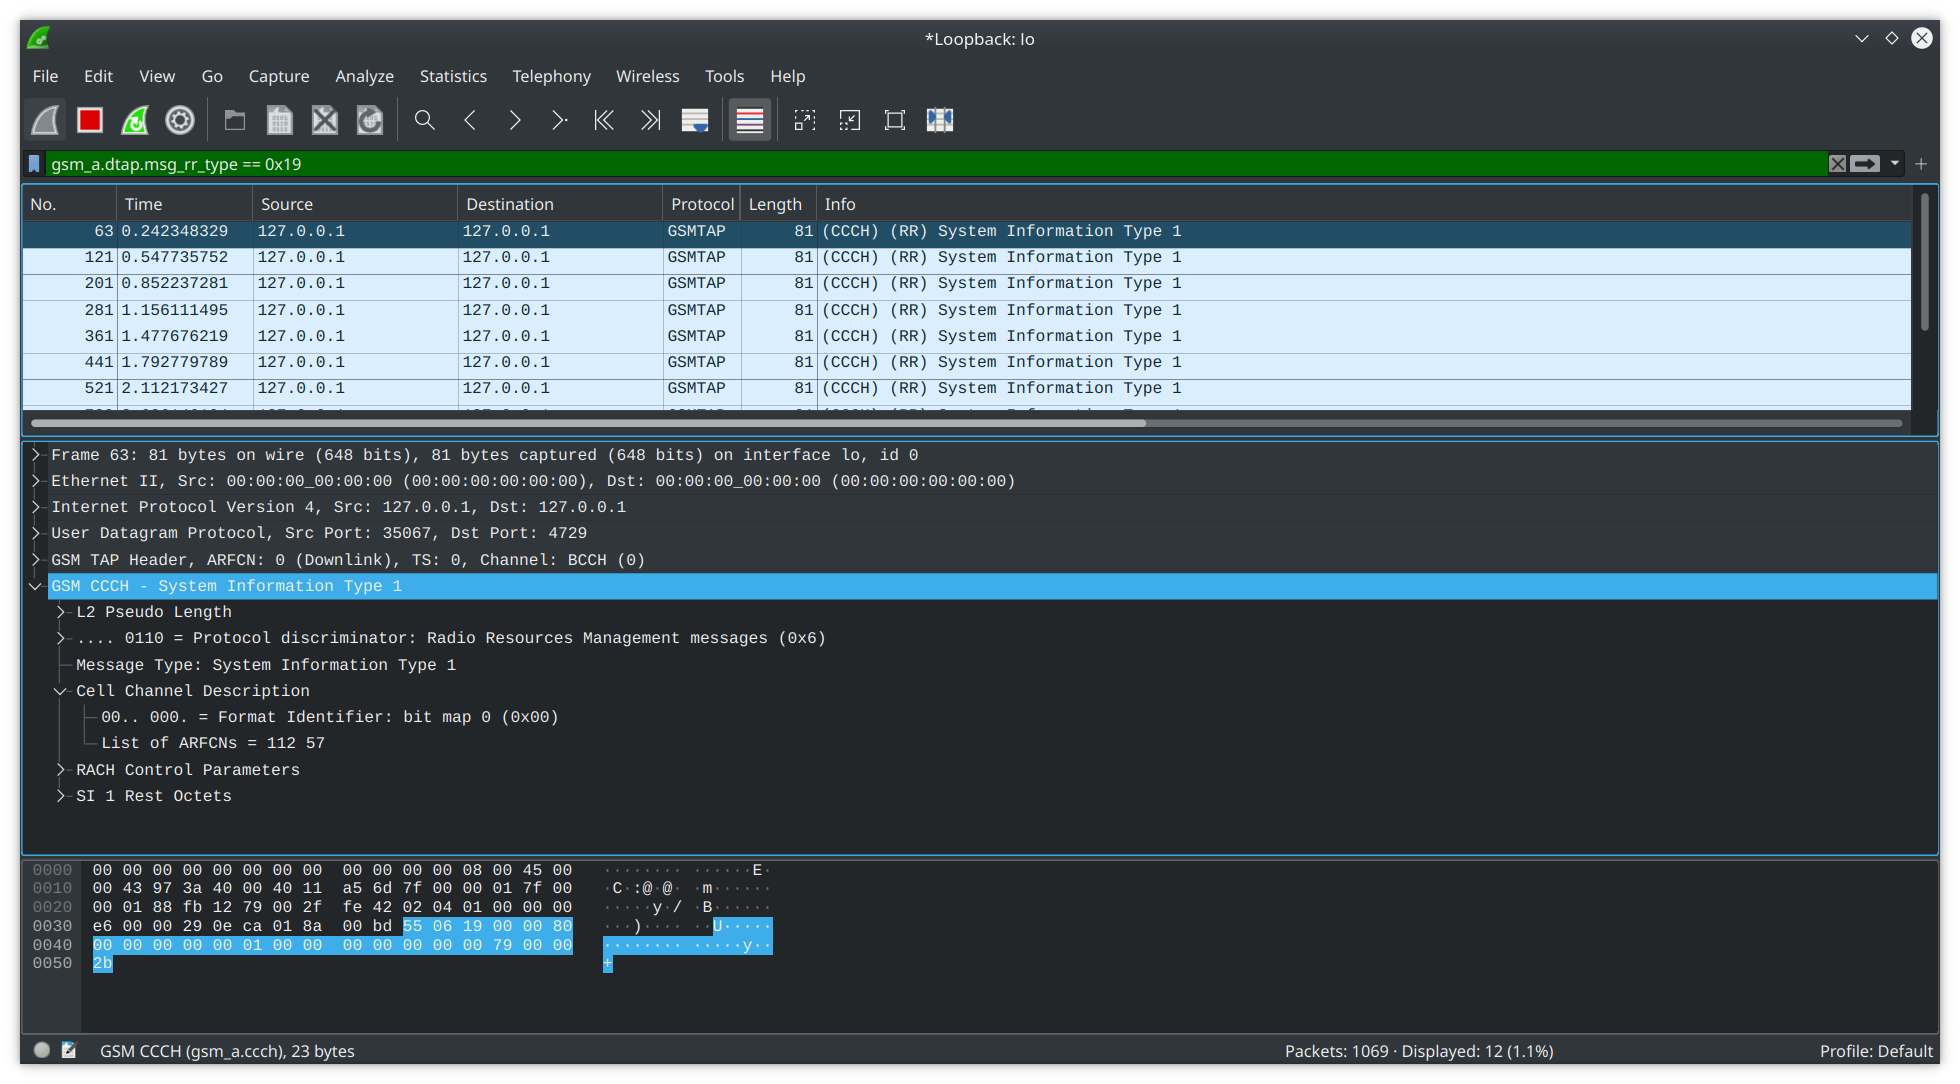
Looking under Cell Channel Description we can see that this base station is configured to use two ARFCNs: 57 and 112.
Capturing traffic
Using the ARFCN calculator we can see that the downlink frequencies for those channels are 946.4 and 957.4 MHz. The minimum frequency range to capture both would be 946.3 to 957.5 MHz. Adding 0.1 MHz to each end to account for the 0.2 MHz channel bandwidth.
For the capture itself, we’ll use the grgsm_capture utility. We can use the -f flag to set the center frequency between our two channels, and the -s flag to set a sufficient sample rate / bandwidth.
Usage: grgsm_capture [options] output_filename

RTL-SDR capturing app of gr-gsm.

Options:
  -h, --help            show this help message and exit
  -f FREQ, --freq=FREQ  Set frequency [default=none]
  -a ARFCN, --arfcn=ARFCN
                        Set ARFCN instead of frequency (for PCS1900 add0x8000
                        (2**15) to the ARFCN number)
  -g GAIN, --gain=GAIN  Set gain [default=30.0]
  -s SAMP_RATE, --samp-rate=SAMP_RATE
                        Set samp_rate [default=1.0M]
  -T REC_LENGTH, --rec-length=REC_LENGTH
                        Set length of recording in seconds [default=infinity]
  -p FREQ_CORR, --freq-corr=FREQ_CORR
                        Set frequency correction in ppm [default=0]

  Additional osmosdr source options:
    Options specific to a subset of SDR receivers supported by osmosdr
    source.

    -w BANDWIDTH, --bandwidth=BANDWIDTH
                        Set bandwidth [default=samp_rate]
    --bb-gain=BB_GAIN   Set baseband gain [default=20.0]
    --if-gain=IF_GAIN   Set intermediate freque gain [default=20.0]
    --ant=ANTENNA       Set antenna [default=]
    --args=DEVICE_ARGS  Set device arguments [default=]. Use --list-devices
                        the view the available devices
    -l, --list-devices  List available SDR devices, use --args to specify
                        hints
The center frequency is set to 951.9 MHz, and the sample rate / bandwidth is set to 12 MHz. Technically we could go down to 11.2 MHz, but 12 is a nice even number so that’s what I’ll use here. You can also configure the gain, but I found the default of 30 dBi to work fine.
If you see 0’s printed in your console it means your dropping samples in the capture. This basically means your computer can’t keep up with the data streaming from the SDR. A common cause of dropped samples are spikes in disk writes from the capture utility, and the disk can’t save the data fast enough. Increasing the buffer on the USRP can help, which we do via the --args flag. You could also try capturing data with the uhd_rx_cfile utlity, which may perform slightly better.
If you still get dropped samples, you could also try saving capture files to the /dev/shm/ directory. This will store the capture files in memory instead of disk, which has performance benefits. The downside here is there will be less storage space for the capture.
grgsm_capture --args="uhd,num_recv_frames=1024" -f 951.9M -s 12.0M call.cfile
Note: Before taking the capture you need to make sure your phone is communicating over GSM/2G. Most phones let you set this within the cellular data options, though depending on your exact phone and carrier settings the option may be hidden. If you don’t see the option try using a different phone. The lowest I could go on my iPhone was 3G, but Android let me set 2G. Also worth noting is that my iPhone would have automatically downgraded to 2G if I disabled 4G and was in an area without 3G coverage.
Start the capture, and Ctrl+C out once you’re done. Keep in mind at this point we’re just capturing the downlink traffic from the base station to the phone. Some good tests would be to either place a call or receive a text message.
Channelize capture
call.cfile is “wideband” capture that contains two ARFCNs. For further processing with gr-gsm we need to split each channel into its own capture file.
We can use the grgsm_channelize utility for this. Set the frequency and sample rate so they’re the same as when we did the capture. At the end of the command append the list of ARFCNs to extract.

A new folder will be created that contains separate capture files for each ARFCN.
Analyzing BCCH traffic
Now we can decode the BCCH traffic from our capture. The BCCH, or broadcast control channel is where the phone listens to get told what to do. So if you receive a call, an Immediate Assignment message is sent over the BCCH that says “Hey you have an incoming phone call, go talk on channel XYZ”.
Our base station’s main ARFCN is 57, which is where we’ll find the BCCH traffic. grgsm_decode is useful here: -a sets the ARFCN, -c sets the channelized capture file, -m sets the channel mode to BCCH, and -t sets the timeslot, which is always 0 for BCCH traffic.
grgsm_decode -a 57 -c out_57.cfile -m BCCH -t 0
To see relevant Immediate Assignment packets, you can use the following display filter: gsm_a.rr.dedicated_mode_or_tbf == 0.
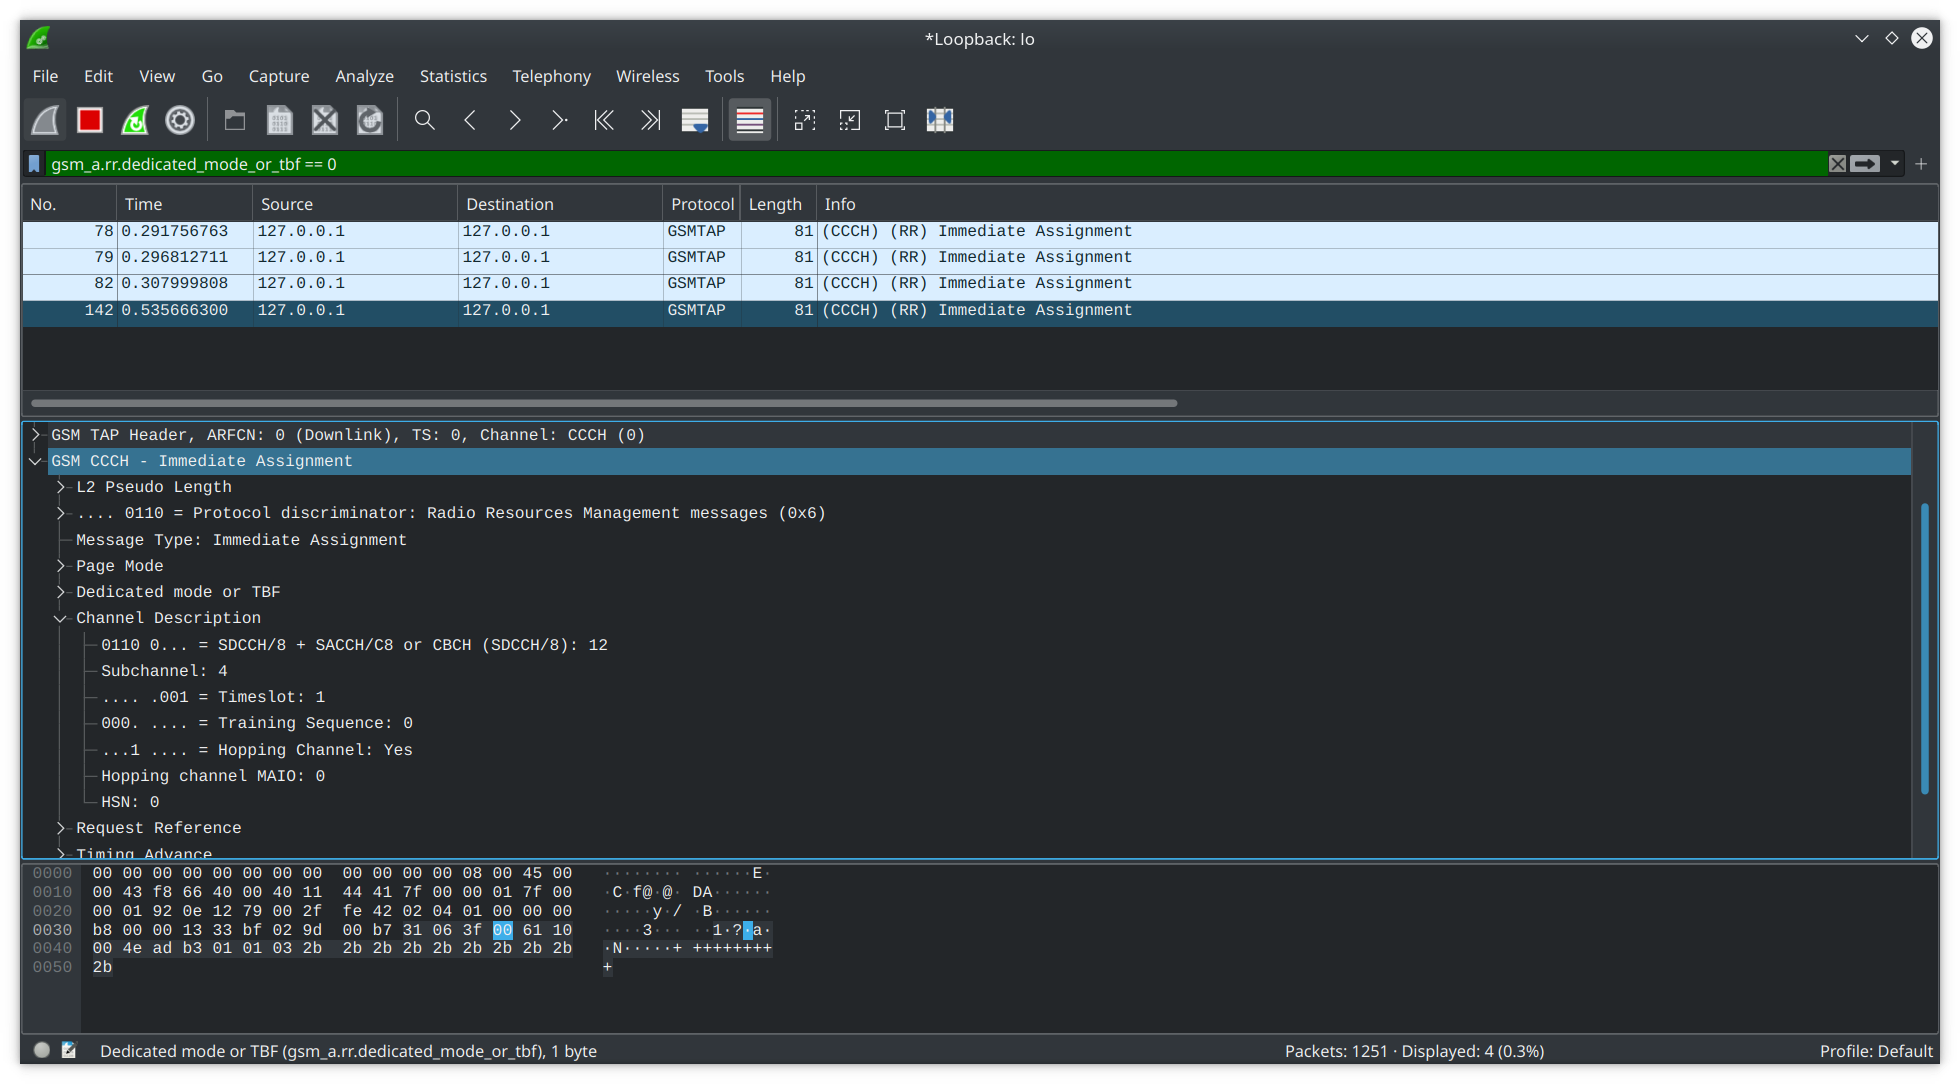
Take a look at Hopping Channel: Yes, under Channel Description. If this is set to No in your capture, you’re in luck and things are a lot simpler. You can just re-run grgsm_decode with the mode set to SDCCH8 and the timeslot from the Immediate Assignment packet. For example:
grgsm_decode -a 57 -c out_57.cfile -m SDCCH8 -t 1
At this point you would be able to see the encrypted packets related to your call/text in Wireshark.
Though because channel hopping is on in our case, the packets are spread across multiple channels. If we were to run the command above, it would fail because some bytes are on ARFCN channel 57 and some are on 112. We need to tell gr-gsm how to piece things back together.
De-hopping traffic
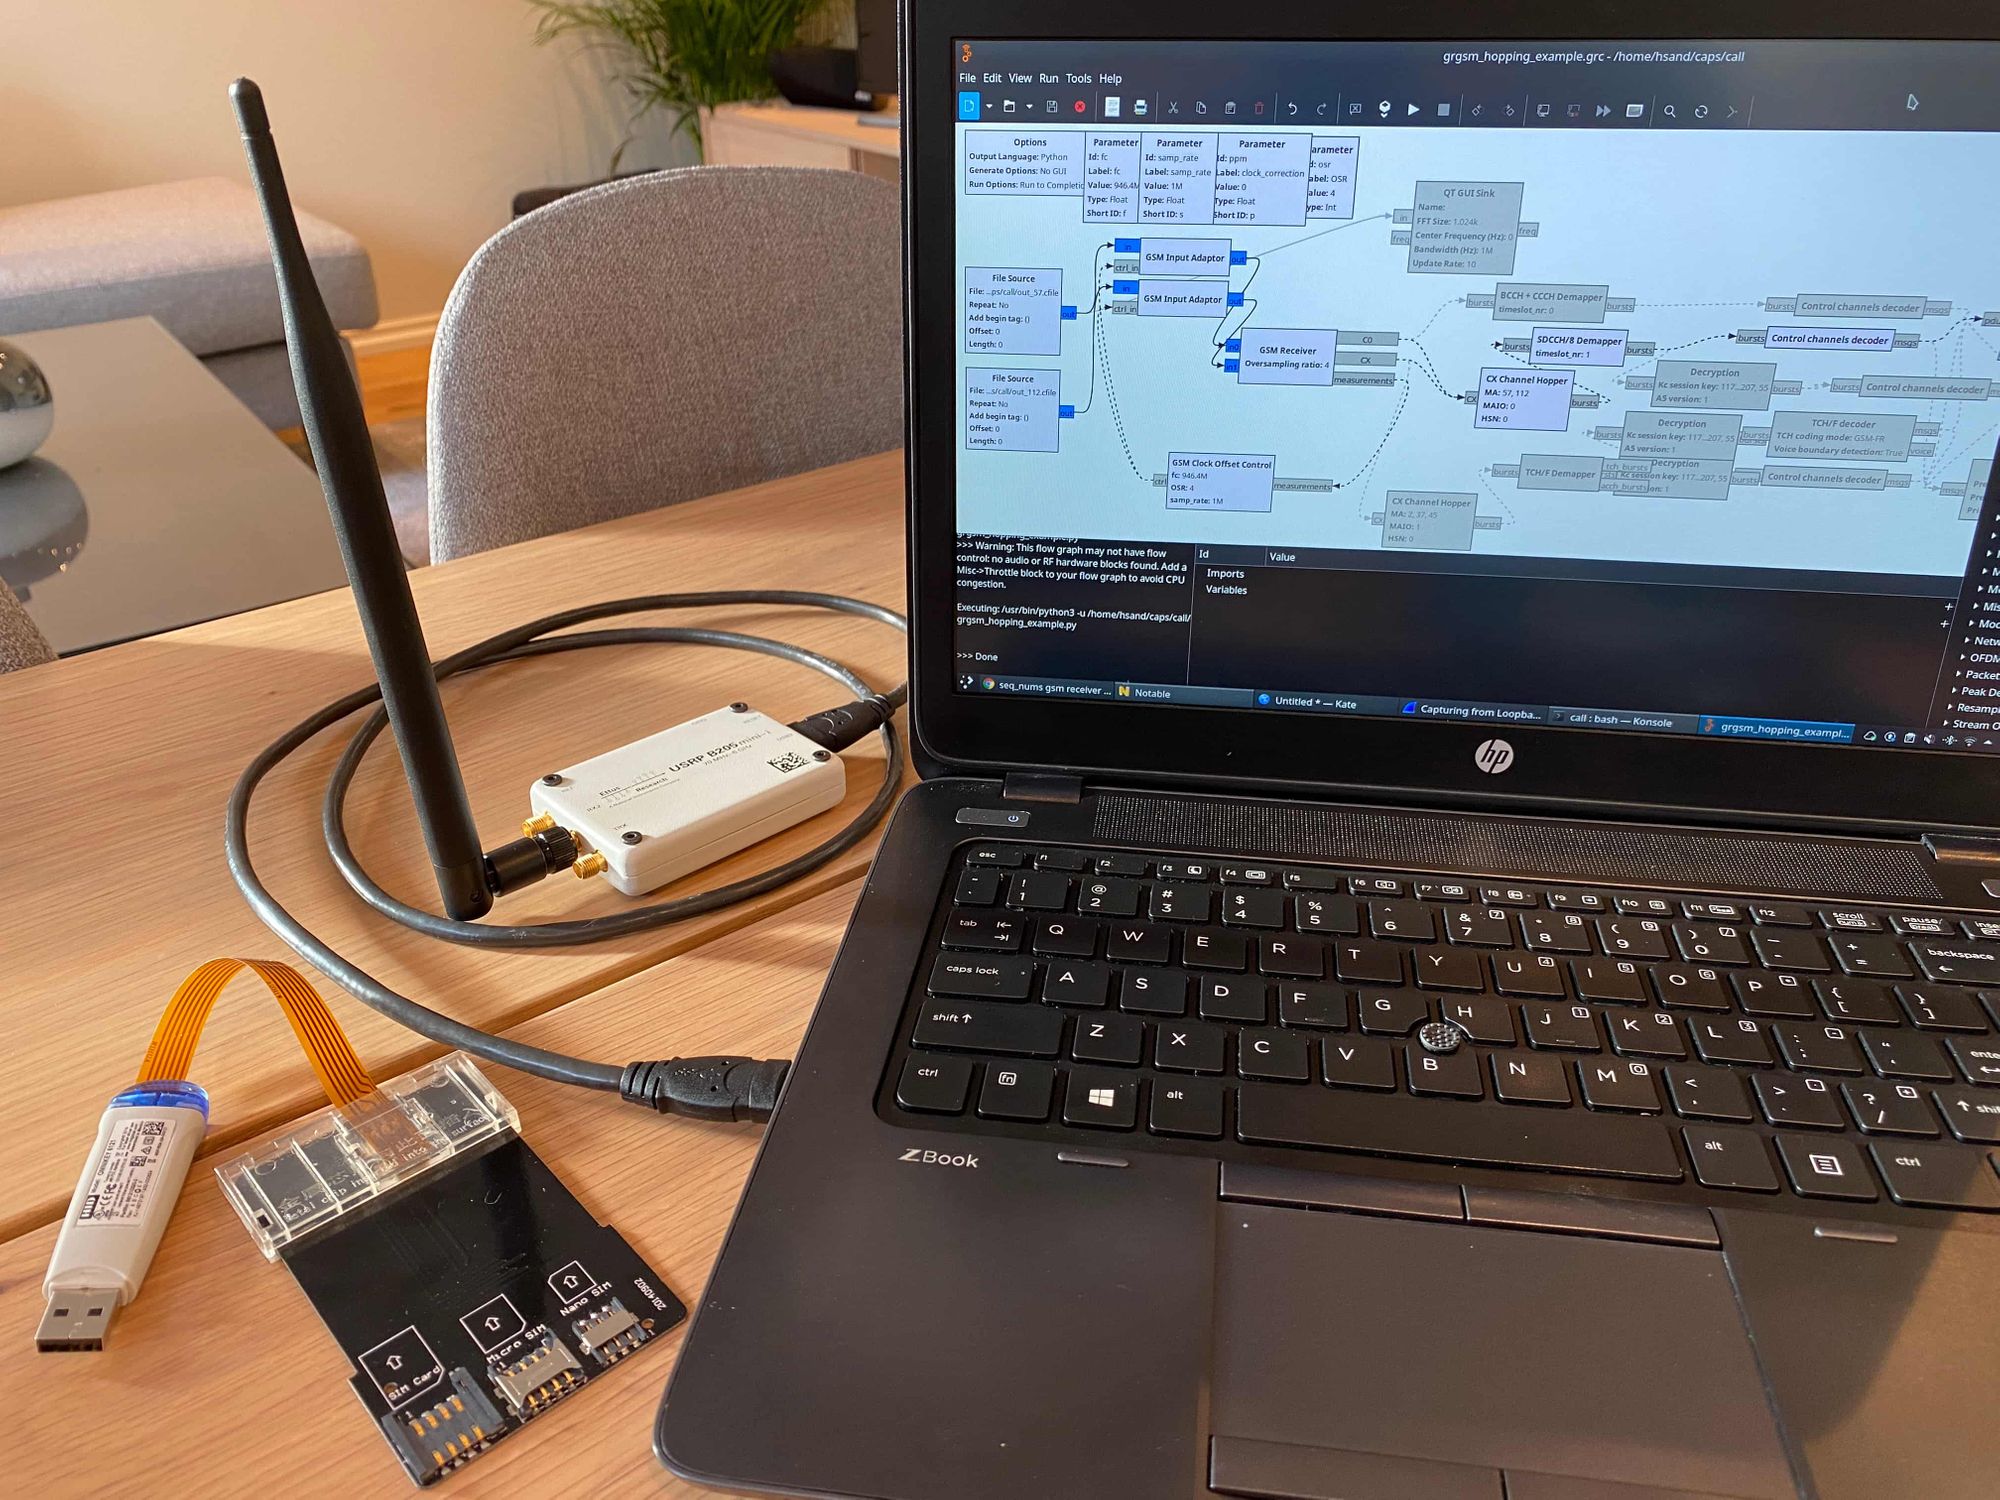
Unfortunately gr-gsm doesn’t have any nice command line utilities to de-hop traffic. You need to get your hands a bit dirty with GNU Radio Companion. Though there is an example to use as a starting point.
gr-gsm provides grgsm_hopping_example.grc, so you can get an idea of how things are supposed to work.
gnuradio-companion grgsm_hopping_example.grc
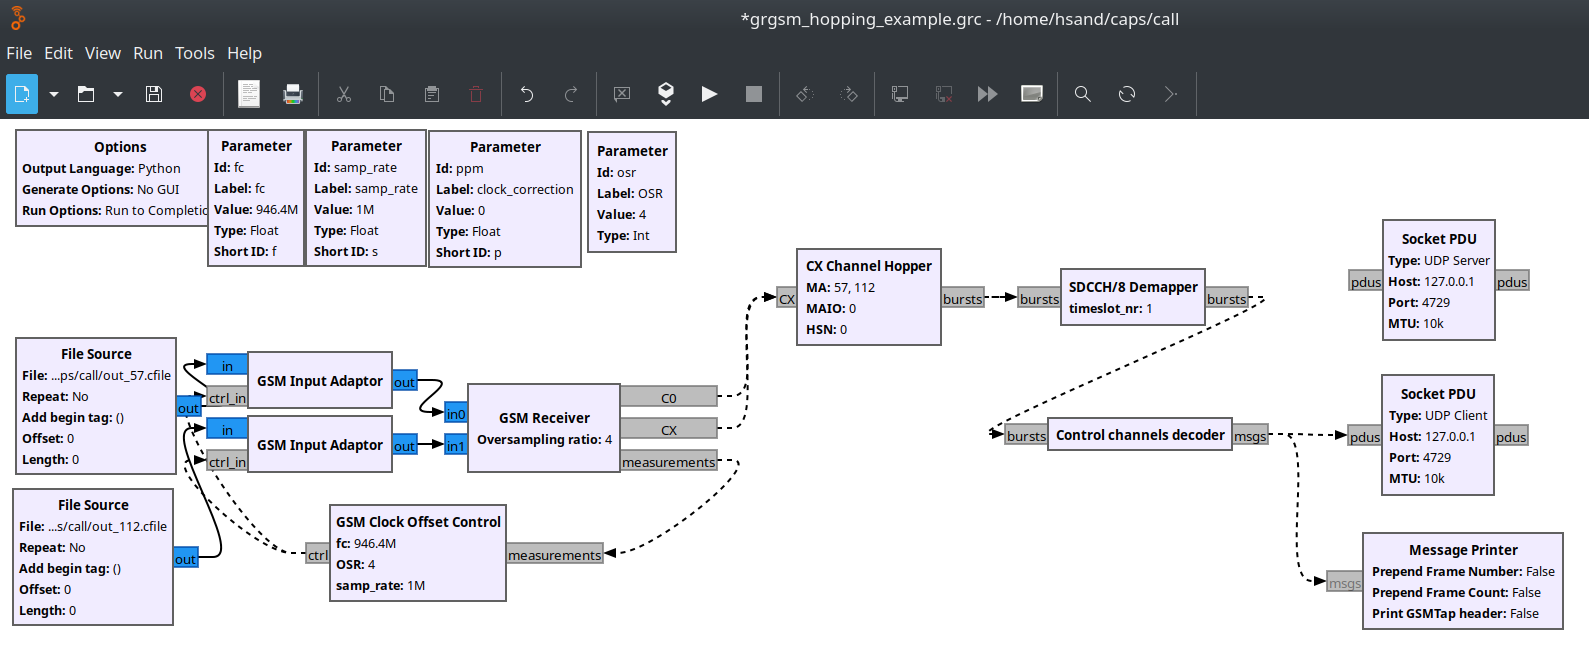
There’s a few things that need to be configured for your environment. I started by disabling the blocks in the example that deal with decryption. Right now I just want to make sure that it was possible to de-hop the data successfully. After that there’s a few customizations to make to the example:
- Update the number of File Source / GSM Input Adaptor / GSM Receiver inputs to match the number of channels you captured from your base station (
2) - Enable the hidden “GSM Clock Offset Control” block
- Update the Cell allocation setting in the GSM Receiver to match the ARFCNs you’re using (
[57,112]) - Update the TSEQ number in the GSM Receiver to the Training Sequence in the Immediate Assignment packet (
[0]) - Update the CX Channel Hopper block: MA to a list of the ARFCNs (
[57,112]), MAIO and HSN to what was in the Immediate Assignment packet (both 0’s) - Set the timeslot in the SDCCH/8 Demapper block (
1) - Change the ppm to
0, or whatever you need for your radio - Sample rate to 1M (
1e6) to match the sample rate thatgrgsm_channelizeused - Set the fc to the frequency of the base station (
946.4e6)
I also changed the Socket PDU blocks to use UDP instead of TCP. After that press the play button. If everything went well you should see packets in Wireshark. You may need to play around with the order of the ARFCNs if you don’t see data.

If you can see Ciphering Mode Command packets you’re in pretty good shape! This is part of the handshake process between the base station and the phone to decide how to encrypt your data.
Next steps
At this point we were able to capture and decode GSM traffic, be we haven’t decrypted anything just yet. I walk through how to decrypt SMS messages in another post.
Though even without decrypting any data, it is an interesting exercise to audit your mobile provider, and see to what extent your data is protected. The example above uses the A5/3 cipher, but I have also seen the A5/1 cipher in use as of 2021, which is exceptionally bad.